
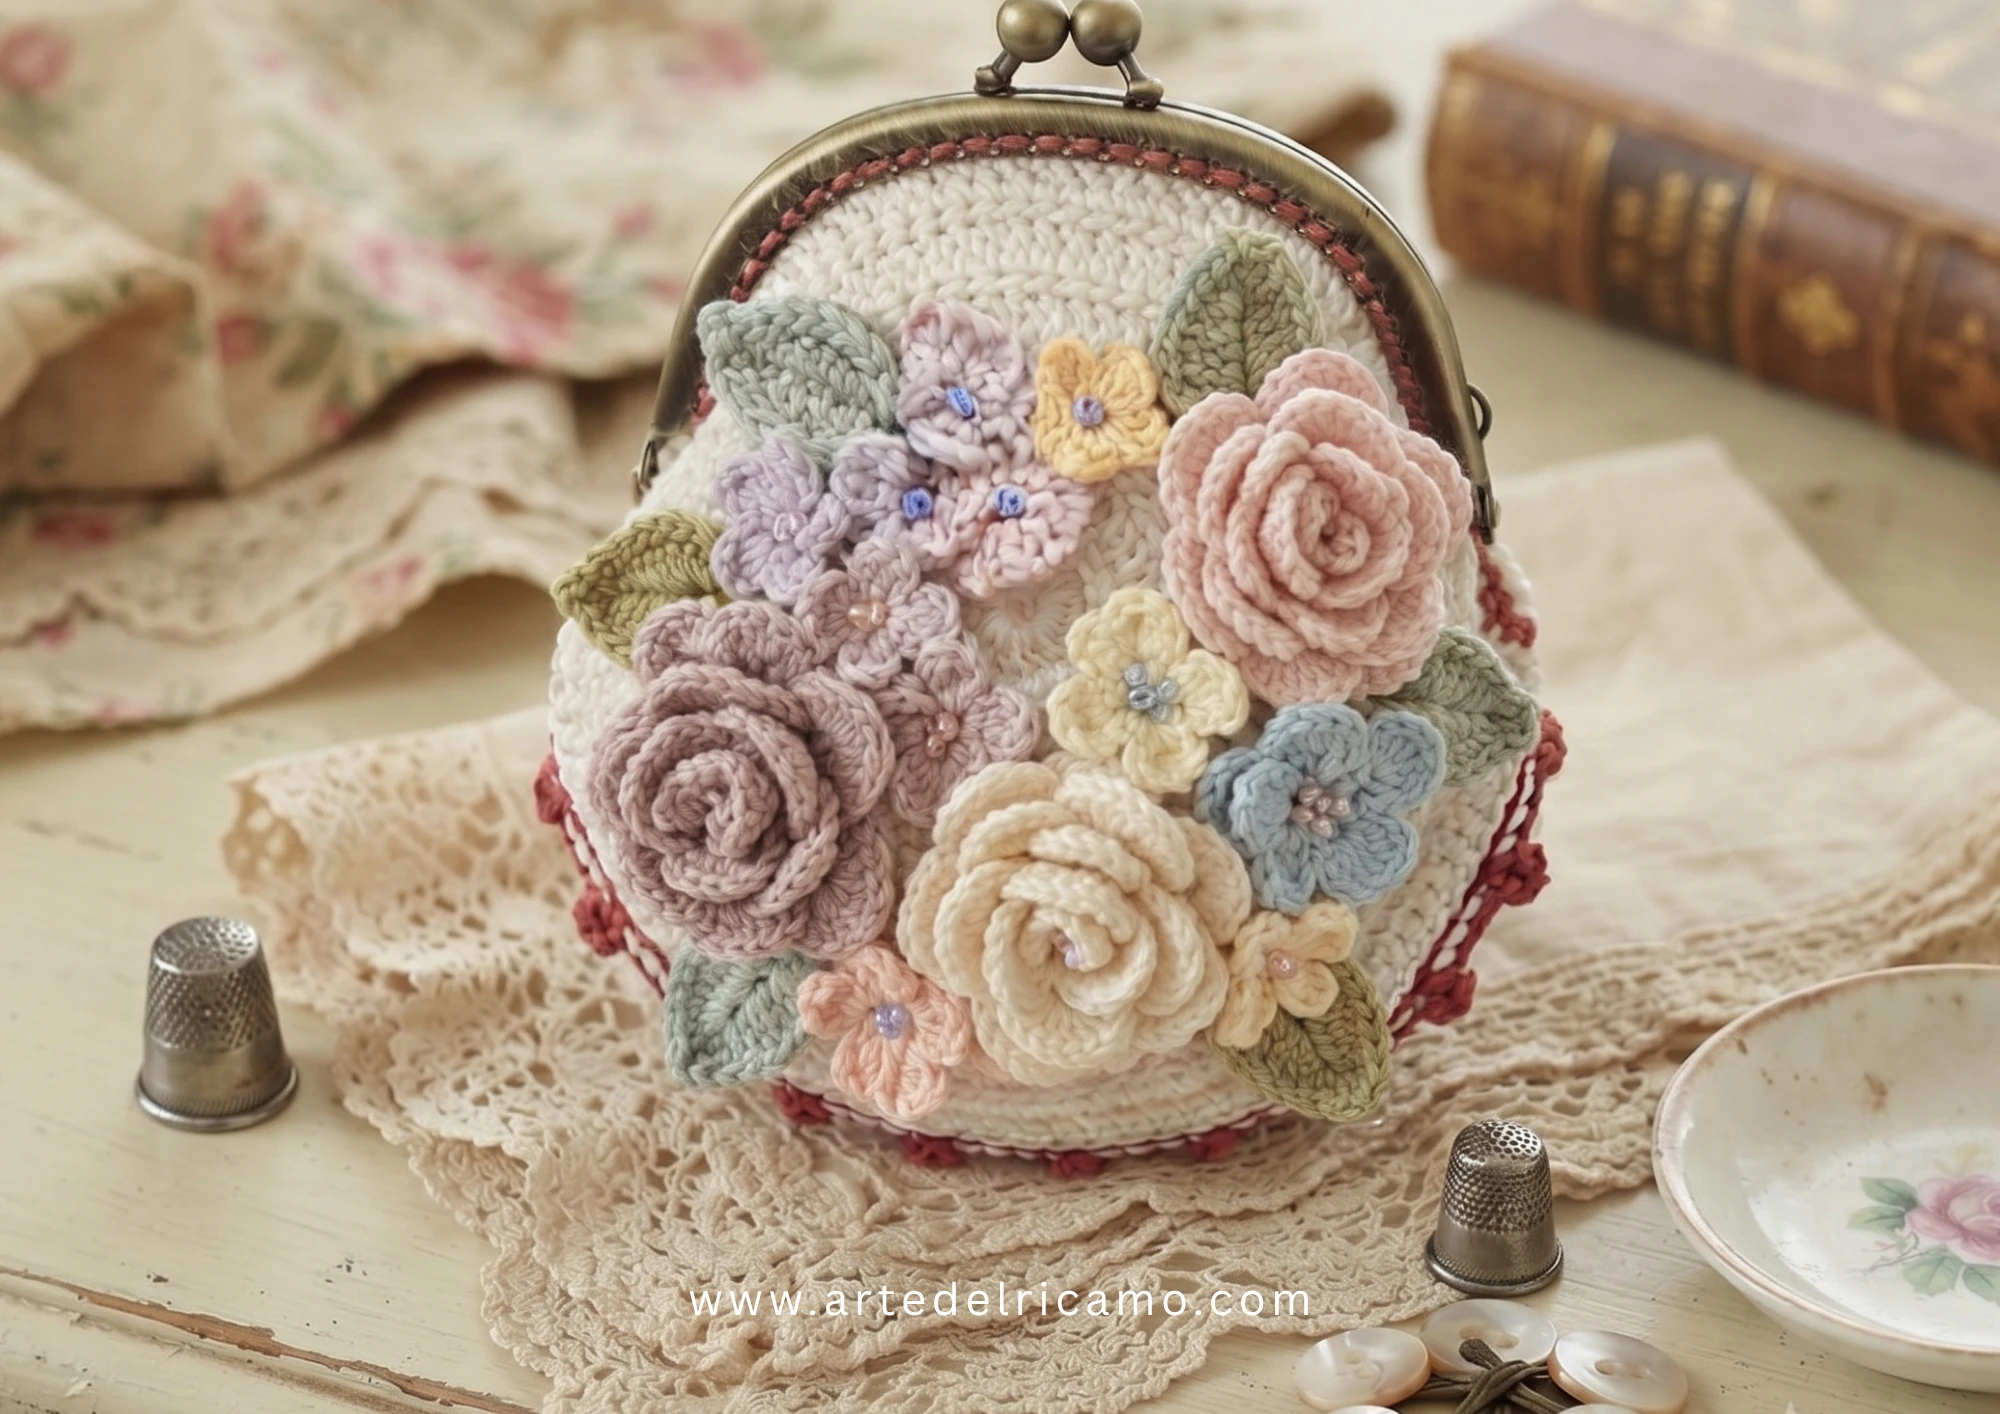
Easy Tutorial: How to Create a ‘Flowering Garden’ Crochet Coin Purse
Create a stunning, handmade “Flowering Garden” crochet coin purse with this easy step-by-step tutorial. Perfect for beginners, this romantic accessory is a beautiful gift or a personal treasure. Start your next project today!
There is a special kind of magic that happens when you take a simple ball of thread and transform it into something tangible and beautiful. We’ve all been there—staring at a delicate handmade accessory in a shop window and thinking, “I wish I could make that.” Well, today is the day we turn that wish into reality.
I am thrilled to share my tutorial for the ‘Flowering Garden’ coin purse—a dainty, romantic piece that fits perfectly in your palm. Whether you’re looking to challenge your skills or simply carve out a little time for creative meditation, this project is for you. Let’s grab our hooks and bring this little garden to life together.
Before picking up your crochet hook, we must ensure we have everything needed.

Materials
- Crochet thread: Anchor Freccia size 6 for the body of the coin purse, in cream or white.
- Yarn: DMC Perlé size 8 or 5 for the flowers and leaves in pink, light pink, light lilac, yellow, light yellow, light blue, and aqua green.
- Crochet hook: 2.00 mm.
- Other: 1 coin purse frame/clasp.
Instructions
Imagine the body of the coin purse as a painter’s blank canvas. We need to create two identical pieces that, once joined, will form the structure. Start by working in the round.

Are you confident with chains? Great. The basic crochet stitches used for this project are:
- Chain (ch)
- Single crochet (sc)
- Double crochet (dc)
Follow the pattern calmly, working for 12 rounds in a fancy stitch. This is the phase where you will see the circle grow before your eyes. Don’t rush: every stitch you make is a step toward the final result.
After the first 12 rounds, we must add depth. Work 3 rounds of single crochet along the edge. This is what will give the coin purse its side “shape.” You will see, once you have finished these two pieces, it will already feel like you can see the finished coin purse in your hands!
Summary:
- Body construction: Make 2 identical pieces.
- Work in the round following the pattern for 12 rounds of fancy stitch.
- Continue by working 3 rounds of single crochet for the border (the side part).
Decorations
Working and applying decorative elements: Now comes the fun part, where we get creative. We need to create the rolled roses, small flowers, and leaves that will decorate our purse.
When working the roses, remember to sew the center and the edge with the same color thread: this trick makes the work clean and harmonious.
For the smaller flowers, I suggest fixing the center with a French knot. It adds that precious detail that makes the difference between a common job and a professional one.

And the leaves? They are the stars that frame the bouquet. Define the central vein by sewing carefully. A piece of advice: when you finish working each small piece, leave the thread a little longer. You will need it later to sew it onto the body of the coin purse without having to make too many hidden knots.
How to Assemble the Coin Purse

We are almost there! Place the two body pieces right sides together. Now we will join them by working a single crochet edge along the ★ sign. Be careful to catch the stitches of both sides simultaneously.
This is where precision pays off: make sure they are well aligned. Finally, the critical moment arrives: the clasp. Sew it on with patience, following the marks. Don’t force the thread; take the time necessary to make it adhere perfectly to the crochet fabric. This is the moment your project goes from being a simple weave to a real accessory ready for use.
Joining the bottom:
- Place the two bodies of the coin purse right sides together (back side facing you).
- Join the two pieces by working a border of single crochet (taking the stitches of both sides simultaneously) in correspondence with the ★ sign.
- Applying the clasp: Sew the clasp on according to the mark.
Technical Notes
- Joining the bottom (★): The 2nd round is worked into the top of the stitch of the 1st round. The 3rd round is worked by inserting the hook behind the 2nd round and taking the top of the stitch of the 1st round.
- Decorations (flowers):
- Roses: Sew the center and the edge with thread of the same color.
- Small flowers: Secure the center with a French knot using DMC mouliné thread.
- Leaves: Sew the central part with thread of the same color.
- When finishing the pieces, leave the thread a bit longer to facilitate sewing and fixing to the main body.
Care and Protection
To ensure your coin purse remains as beautiful as the first day, here are some tips:
- Protection of decorations: Since the decorative elements are sewn externally, handle them with care when placing the purse in your bag, avoiding letting them get stuck on other metal objects or keys.
- Delicate cleaning: Being made of cotton, if the purse gets dirty, I recommend washing it exclusively by hand in cold water with a neutral soap, without scrubbing hard to avoid ruining the floral decorations.
- Drying: Do not wring; gently pat with a white towel to absorb excess water and let it dry flat, away from direct heat sources or intense sunlight that could fade the yarn colors.
- Storage: When not in use, place it in a cloth bag or a dry place, avoiding crushing it to keep the shape of the flowers and the main body intact.
And there you have it—your very own ‘Flowering Garden’ coin purse! I hope this project brought as much joy to your hands as it will bring to your everyday routine.
Remember, every stitch you made was a unique expression of your creativity, and that is what makes handmade items so truly special. Don’t be afraid to experiment with different color combinations or add your own personal flair. I would absolutely love to see your finished work, so please share your photos and let me know how your little garden grew. Happy crocheting!