
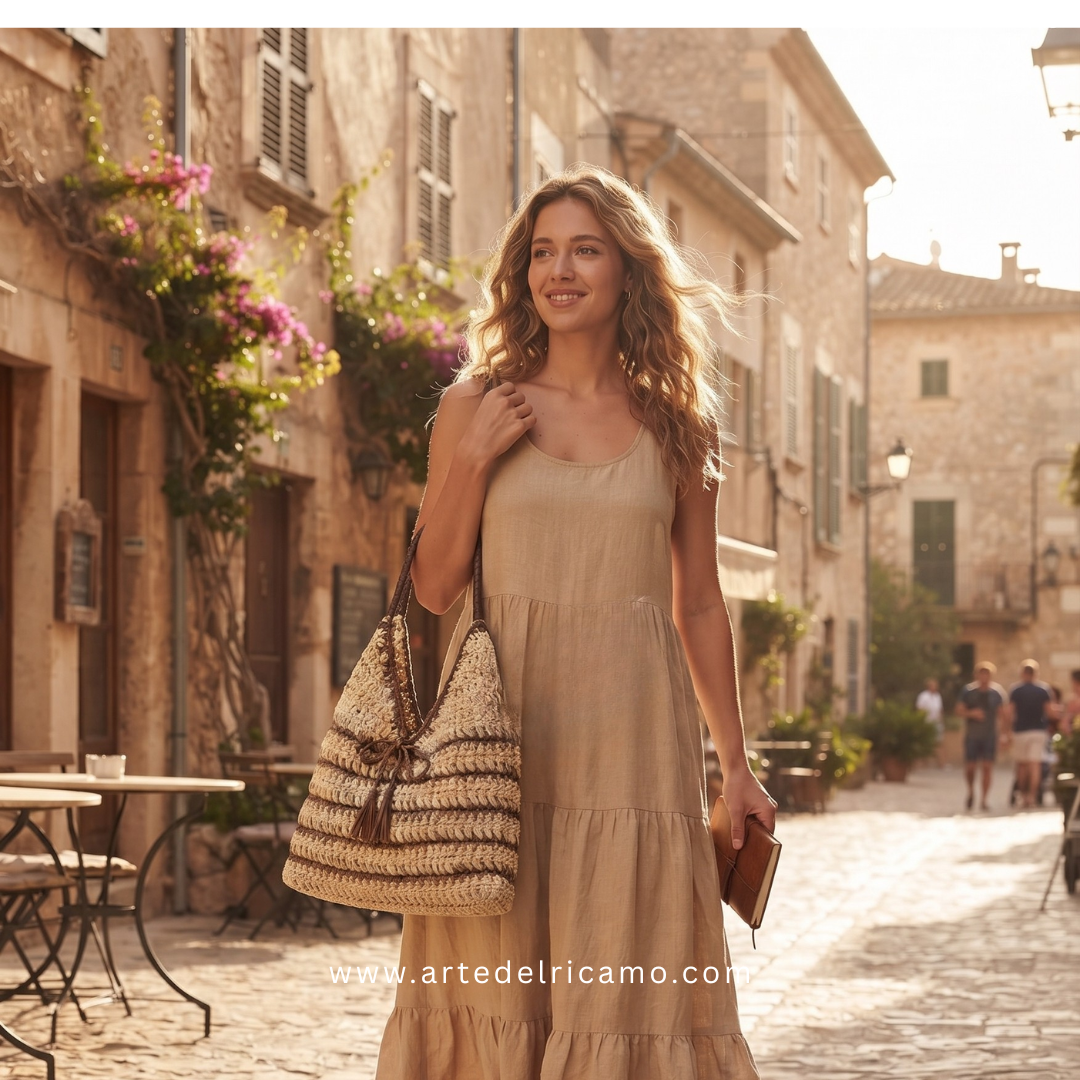
The Art of Natural Weaving: Making the Crochet Bag with Paper Fiber
Discover how to create a woven paper yarn bag with this step-by-step tutorial. A sustainable and elegant project perfect for summer, blending crochet techniques with modern design.
Ideal for those who love high-quality craftsmanshipIn the world of contemporary handmade craft, the quest for sustainable materials with an authentic charm has brought an ancient technique back to the forefront, skillfully reimagined for modern times: the use of paper yarn. The bag we explore in this guide is not just a summer accessory; it is a fashion statement that blends the rustic quality of raffia with the lightness and versatility of twisted paper.
In this article, we will guide you step-by-step through the creation of this unique model, analyzing not only the execution technique but also the secrets for working with this particular material.

1. The Philosophy of the Project: Why Paper Fiber?
The charm of this bag lies in its materiality. “Paper yarn” is an innovation that reinterprets the classic raffia look. Unlike natural raffia, which can sometimes be stiff or irregular, twisted paper yarn offers a consistency in thickness that facilitates crochet work while maintaining a solid yet surprisingly soft structure.
This design choice transforms an accessory into a tactile element, perfect for accompanying a summer outfit (like the brown dress worn by the model in the image) with naturalness and elegance.
2. Preparation and Materials
Before diving into the work, it is essential to organize your materials. For a bag with final dimensions of approximately 30×36 cm, you will need:
- Twisted raffia yarn (100% paper): 1 skein of 150g, beige.
- 100% cotton yarn: 1 skein, dark brown.
- 4 mm crochet hook.
- Yarn needle.
- Stitch markers (SM).
Size: Approximately 30×36 cm.
The Professional’s Trick
For the brown yarn, the pattern recommends using two strands together. To make the work easier and avoid tangles, we suggest preparing two separate skeins before starting so that you can pull the thread from both simultaneously without unnecessary tension.
3. Instructions

Preliminary Informations
- 2 crossed double crochets (2 dc cross): Skip 1 st, 1 dc in the next st, 1 dc in the previous skipped st.
- The bag is worked in the round, from the bottom up. The handle is worked in back-and-forth rows at the base of the top edge.
- When working with the brown yarn, join two strands and work them together; we recommend preparing two separate skeins.
The work is done in the round, from the bottom up. This technique provides the bag with superior strength, eliminating the need for side seams that could weaken the structure.
Work Phases
- The Base: Start with the beige yarn, chaining 42. Follow the first round scrupulously, working around the base chain to create a solid oval.
- The Body: Continue with the crossed double crochets for the first few rounds. The transition to brown yarn (worked double-stranded) in the 4th and 5th rounds creates a band of color that breaks the monotony and adds structural strength.
- Continuity: From the 6th to the 21st round, repeat the sequence from the 2nd to the 5th round. This alternation is not only decorative but marks the rhythm of the bag.
Bag Base and Body
- Using the beige yarn, chain 42 and work as follows:
- Round 1 (RS): 1 sc in the second chain from the hook, 1 sc in the next 39 chains, 3 sc in the last chain; rotate the work to continue on the opposite side of the foundation chain: 1 sc in each chain until the last, 2 sc in the last chain; 1 sl st in the initial sc. [84 sts].
- Round 2: 3 ch (counts as the first dc, also in subsequent rows), 1 dc in the stitch to the right of the 3 ch, 41 pairs of dc cross; 1 sl st in the third initial ch. [42 pairs of dc cross].
- Round 3: Repeat the second round.
- Switch to the brown yarn (held double).
- Rounds 4 and 5: 1 ch (does not count as a stitch, also in subsequent rounds), 1 sc in each stitch of the row; 1 sl st in the initial sc. [84 sts].
- Switch to the beige yarn.
- Rounds 6 to 21: Repeat from the 2nd to the 5th round.
Handle
- Formed by 2 parts worked separately and sewn together.
- Flatten the bag and insert 1 SM at the center front and 1 SM at the center back (you will have 42 stitches on both sides of the SM). Join the beige yarn in the fourth stitch after the SM.
- Row 1: 3 ch (counts as the first dc), 1 dc in the stitch preceding the 3 ch, 18 pairs of dc cross, turn. [17 pairs of dc cross].
- Row 2: 1 ch (does not count as a stitch), 1 sl st in the first 4 sts, 3 ch, 1 dc in the stitch preceding the 3 ch, 16 pairs of dc cross, turn, leaving the last 2 sts unworked. [17 pairs of dc cross].
- Row 3: 1 ch, 1 sl st in the first 4 sts, 3 ch, 1 dc in the stitch preceding the 3 ch, work in dc cross along the row until the last 2 sts, turn, leaving the last 2 sts unworked. [15 pairs of dc cross].
- Rows 4 to 9: Repeat the third row. [3 pairs of dc cross at the end of the ninth row].
- Row 10: 1 sl st in the first 2 sts, 1 ch, 1 sc in the same base stitch as the chain, 1 sc in the next 3 sts, turn, leaving the last stitch unworked. [4 sts].
- Rows 11 to 35: 1 ch, 1 sc in each stitch of the row, turn.
- Fasten off and repeat on the opposite side. Sew the last rows together to form the handle.
Border
- Join the brown yarn in the last skipped stitch at the center of one side.
- Round 1: (3 ch, 1 sl st in the next dc of the handle row end) repeat until the ends of the sc rows, 1 sc in the end of each sc row, (3 ch, 1 sl st in the end of the next dc row) repeat until the end, 3 ch, 1 sl st at the base of the initial 3 ch, 1 sl st in the 3-ch space.
- Round 2: 1 ch, 3 sc in each 3-ch space and 1 sc in each sc of the round; 1 sl st in the initial sc.
Bow (x2)
- Using the beige yarn, chain 80, then switch to the brown yarn.
- Row 1: 1 sc in the second chain from the hook, 1 sc in each chain.
- Tie into a bow and sew to the center front and back.
4. Handle Architecture
The handle is the critical element that determines the bag’s wearability. It is worked in two separate parts and then sewn together.
- Placement: The use of stitch markers is vital. By flattening the bag, center the markers on the front and back to ensure the handle is perfectly aligned.
- Shaping: The work is done in back-and-forth rows. You will notice that by proceeding upward (from the 2nd to the 9th row), the number of crossed double crochet pairs decreases. This creates an ergonomic curve, making the handle narrower and more comfortable to grip at the top.
- Closure: The final sequence (from the 10th to the 35th row) creates a straight, slim edge, ideal for holding.
5. Finishing Touches: Elegance is in the Details
Crochet work is recognized by the care put into the finishing touches.
- The Border: The brown border round, with its chains and slip stitches, acts as a “frame”. This step provides a professional and polished look, covering any irregularities from the previous work.
- The Bow: Do not underestimate the importance of the bows. In addition to being a decorative detail, they help to visually “close” the top of the bag, giving it a romantic and artisanal touch.
6. Tips for Project Success
- Tension Management: Working with paper fiber, thread tension is different compared to wool. Maintain consistent tension to prevent the paper from breaking or the work from becoming too stiff.
- Patience with the brown: Working two strands of cotton together requires practice to keep the stitches uniform. Take your time, especially during the 4th and 5th rounds.
- Customization: If you want a larger bag, you can increase the number of starting chains, remembering to keep a stitch count consistent with the crossing pattern.
Making this bag is not just a technical exercise but a journey into sustainable design. By carefully following these steps and respecting the nature of the material, you will obtain a unique piece capable of resisting wear and maintaining its rustic-chic charm for many seasons. The final result will be an accessory that speaks to who you are, your dedication, and your manual skill.
Happy crocheting to all enthusiasts!