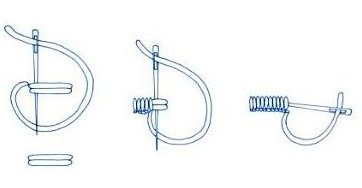
Buttonhole stitch bars are traditionally used for linking areas of cutwork, in freestyle embroidery and in cut-work and Richelieu Work.
embroidery classes, learning different kind of stitches, needlework

Buttonhole stitch bars are traditionally used for linking areas of cutwork, in freestyle embroidery and in cut-work and Richelieu Work.
The alternate name of this embroidery stitch is Venetian Picot. Buttonhole picots are generally used for edging lace; they may be adorned with small pinned picots to produce a richer effect.
This makes a larger picot than bullion picot, and a firm, rounded thread should be used. Is is worked from right to left, which makes the buttonhole edging stitch that it is usually decorates a little difficult to work but the picots themeselvs easier to effect. Continue reading
Single Feather Stitch is also known as slanted buttonhole stitch. It is a line and smocking stitch used on plain-and evenweave fabrics. A variation of feather stitch, it makes a much plainer line wich is equally effective worked straight or following a curve.
It is worked downwards, and the looped stitches are made only at the right of the line. It has a similar appearance to blanket stitch, but the arms of the stitch are set at an angle. Continue reading
Up and Down Buttonhole Stitch is similar to German knotted buttonhole stitch but with a smoother, neater finish.stitch. This is also known as Mirrored buttonhole stitch, it is useful for outlines, but can also be used as an open filling stitch when parallel rows are worked close together.
Closed Feather Stitch is a wide line stitch used on plain-and even-weave fabrics and is a variation of feather stitch. With this stitch you can make a decorative lacy line, it is worked downwards between two parallel lines; it makes a pretty border when worked in multiple rows. To keep the rows even, guidelines may need to be marked on the fabric if the thread cannot be counted. Continue reading
Blanket stitch is used to reinforce the edge of thick materials. It is defined as a decorative stitch used to finish an unhemmed blanket. The stitch can be seen on both sides of the blanket.
Work a row of small Running Stitches around the circle. Pierce the center with a stiletto and fold back the ragged edge. Closely overcast the folded edge and Running Stitches (A)- trim aqay any ragged edge at the back. (B) shows the appearence of the finished Eyelet Hole.
Larger circles or longer Eyelet Holes may be cut across the center both ways and the cut ends folded back, instead of piercing with a stiletto.
Work the first row of this stitch from right to left similar to Running Stitch, but with all stitches of equal lenght. On the return journey, work in the same way from left to right, filling in the spaces left by the first row.
This stitch is sometimes used as an outline to CrosssStitch designs, as in Assisi Embroidery, but a design can be worked entirely in Holbein Stitch. It should be worked over counted threads of fabric for the best results.